Publication
The Publication panel turns your validated exercises and assessments into a small, self-contained web app that your pupils can use to generate interactive sheets on their own. You download it and host it wherever you like; each pupil picks their grade level and belt, clicks a button, and a fresh interactive sheet opens in a new tab. You can also add static info tiles (for instance a belt programme or a handout PDF).
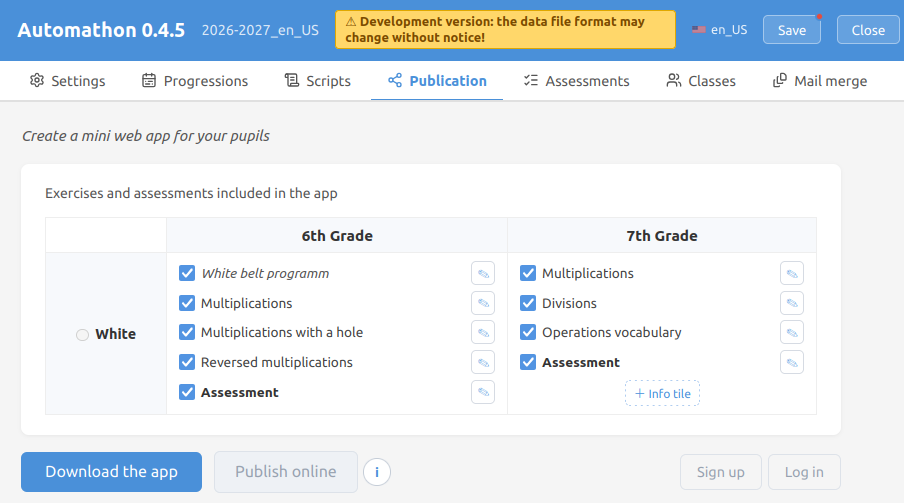
Selecting what to publish
If nothing publishable is validated yet, the panel only shows an informative message: validate at least one assessment in the Assessments tab (Library), or at least one exercise in Scripts → Exercises, first.
Otherwise the panel shows a table:
- columns — the grade levels that hold at least one validated exam or exercise;
- rows — the belt levels;
- each cell lists a checkbox per tile: an optional info tile at the very top (see below), then one for every validated exercise of that grade/belt, with the validated assessment last, at the bottom of the list.
Every box is ticked the first time you open the panel. Untick the ones you are not ready to publish (for instance an exercise you are still working on). Your choice is remembered across visits and travels with the workspace file.
An assessment is what anchors a grade level; exercises come on top. A grade that shows up through exercises only (no validated assessment) carries a small warning under the table — the app still works, it just offers no assessment for that level.
Each exercise or assessment tile also has an edit (✎) button to customize it in the generated app: its displayed title (an exercise defaults to its own title, an assessment to Assessment) and an optional text shown on the tile. These overrides travel with the workspace too. (Info tiles, below, carry their own content and have their own editor.)
Info tiles (static tiles)
Every cell also offers a + Info tile button to add one static tile at the head of that cell — a tile with no generate button, useful for things like the belt's programme or a handout. An info tile carries:
- a title and a free text;
- optionally an image and/or a PDF.
When you attach both an image and a PDF, the image becomes the clickable download link for the PDF (a lone PDF shows a Download the PDF link; a lone image is just displayed). The tile has its own checkbox to include/exclude it, and its edit (✎) button reopens the editor (where you can also delete it).
Attached files are stored inside your workspace file (so the tile travels with
it) — a large file inflates the workspace, so the editor warns past ~2 MB. In the
generated app both the image and the PDF are served from an assets/ folder on
demand (see below).
What pupils see
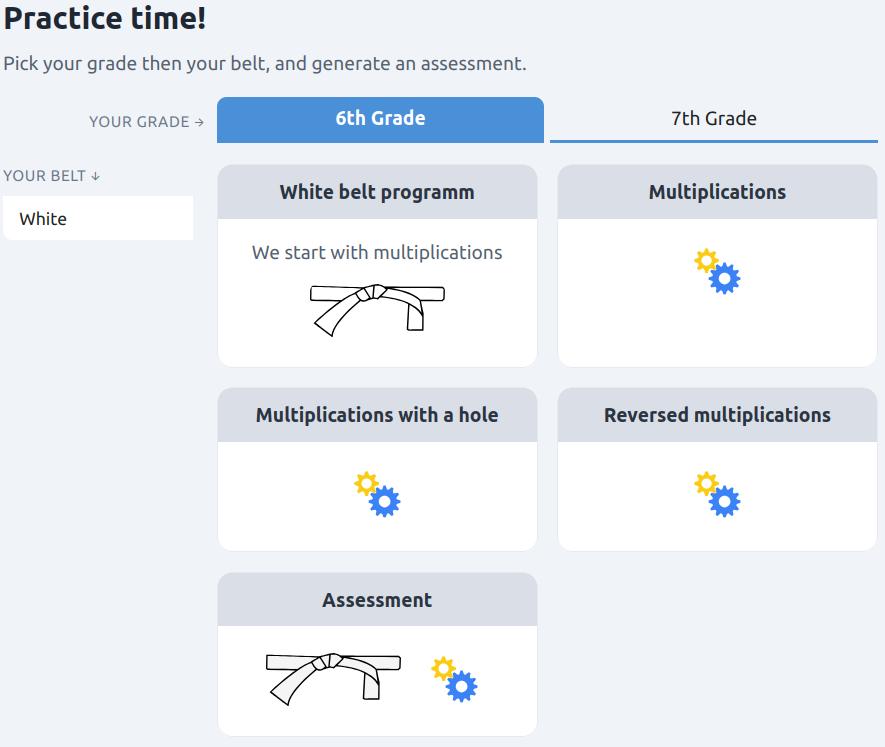
In the app, a pupil picks a grade tab (top) then a belt tab (left). The selected belt shows its sheets as tiles (two per row) — a white card with a grey title band and a gears button. Only the assessment tile shows the belt badge (coloured after the belt); exercise tiles show just their optional text. The belt bands follow a fixed colour scale, matched on the colour word in the belt's name (Jaune, Ceinture violette, Green belt…) rather than on the colour stored in the workspace; a belt naming no known colour keeps its workspace colour. Grade tabs and belt bands alike carry their colour at all times and are lettered in white (the white belt excepted), the unselected ones dimmed. Clicking the gears generates a fresh interactive sheet in a new tab; the gears spin while it is being produced. The new tab opens immediately on a waiting screen — a ring that fills over ten seconds (an estimate) around a counter of the seconds elapsed, refreshed every tenth of a second — and is replaced by the sheet as soon as it arrives. An info tile has no gears — just its text and, if set, its image; when the image links to a PDF, the file downloads only on click.
Opening the app on a given grade (deep links)
The app opens on its first grade tab and first belt. You can point a class straight at its own tab by adding the grade to the address:
https://automathics.net/mrhainaux/5e          → 5e, first belt
https://automathics.net/mrhainaux/5e/jaune    → 5e, yellow belt
The extra segments are the grade tab name, then optionally the belt name,
written in lowercase without accents (spaces become hyphens: Ceinture dorée →
ceinture-doree). An unknown name is ignored — the app just opens on its
default tab. Once such a link is used, the address bar follows the tabs the
pupil clicks, so any selection can be copied and shared.
The host must serve the app for those sub-paths
/mrhainaux/5e is not a file on disk: the web server has to answer it with
the app's index.html. On automathics.net this is already the case. If you
host the app yourself, add the fallback to your server — with nginx:
location ^~ /api/ {                       # keep the API off the rule below
    proxy_pass http://127.0.0.1:9998/;
}

# A path with no file behind it falls back to the app of its first segment.
location ~ "^/(?<app>[a-z0-9][a-z0-9-]*)/" {
    try_files $uri $uri/ /$app/index.html =404;
}
Without it, such a URL simply returns 404 — the app itself keeps working at
its plain address. A fragment works with no server support at all, and is
the fallback for a single-file app you just dropped on a host:
…/automathics-webapp.html#5e/jaune.
Downloading the app
Download the app bundles the selected tiles and a tiny runtime. It is enabled as soon as at least one box is ticked. Info-tile files (images and PDFs) are kept as separate files served on demand, so the page itself stays light. The output is:
- a single
automathics-webapp.htmlwhen no info tile carries a file; - a
automathics-webapp.zip(the HTML plus anassets/folder) as soon as any info tile carries an image or PDF. Keep the folder next to the HTML when you host it.
Serve the assets with correct MIME types
Your web server must return each asset with its proper Content-Type — in
particular an SVG must be sent as image/svg+xml, or the browser will
refuse to display it in the tile (it does not content-sniff SVG, unlike
PNG/JPEG). A standard nginx does this out of the box via its bundled
mime.types. A standalone config that does not include them has to spell
the mapping out:
Hosting the app
The downloaded app talks to an automathd daemon to render each assessment. It
calls a same-origin /api path, so the intended setup is:
- serve
automathics-webapp.html(and, if you downloaded a zip, itsassets/folder alongside) behind a web server (e.g. nginx); - reverse-proxy
/apito a runningautomathd(default127.0.0.1:9998).
This is the same reverse-proxy convention used elsewhere in Automathics. The
single AUTOMATHD_URL line at the top of the app's <script> is the one knob a
host may change — for example to an absolute URL for a quick local test.
Each generated assessment is self-checking: once opened, it validates the
pupil's answers in the browser and offers printing, without any further call to
the server. automathd is only contacted at the moment a new exercise is
generated.
Publishing online
Instead of downloading and hosting the app yourself, you can publish it to a
server that then serves it at automathics.net/<your-id> for your pupils. This
uses the toolbar's Log in and Publish online buttons.
Publishing is token-based (a full account system, behind Sign up, is still upcoming). Rather than a username and password, you hold a publishing token — a secret the server operator issues to you.
- Log in. Click Log in and paste your token. It is validated against the server; on success the button becomes Log out (your-id). The token is kept in this browser only — not in your workspace file, which stays shareable — and Log out clears it. On a shared computer, log out when done.
- Publish. Once logged in, Publish online unlocks. It ships the very same
bundle as Download the app to the server, which serves it at your address;
on success the published URL is shown as a clickable link (it opens in a new
tab). Against a development daemon with no
publish.public_base_urlconfigured, the server only reports the path (/your-id), so the link points at the address the panel itself is served from.
The server decides your identifier from the token, so you can only publish under your own address. It only works against a server configured for publishing and a token it recognizes; otherwise Log in reports that publishing is not available there. You can always fall back to Download the app and host it yourself.